1.4 Running the ANSYS Program
The ANSYS program can be run in interactive mode or in batch mode.
In interactive mode, the analyst exchanges information with the program
continuously. A command can be executed by selecting its menu path in the
GUI or by typing it in directly. The ANSYS program processes the command in
real time. Interactive mode permits to use the GUI, online help, and various
tools to create the model in the graphics window and modify it.
In batch mode, a file of commands is submitted to the ANSYS. A batch
job can be run in the background while doing other work on the system.
Batch mode is useful when there is no need to interact with the program,
such as during the solution phase. The ANSYS Launcher can be used to set
options for an ANSYS run.
1.4.1 Mechanical APDL Product Launcher
1.4.1.1 Starting an ANSYS Session from the Start Menu/Launcher
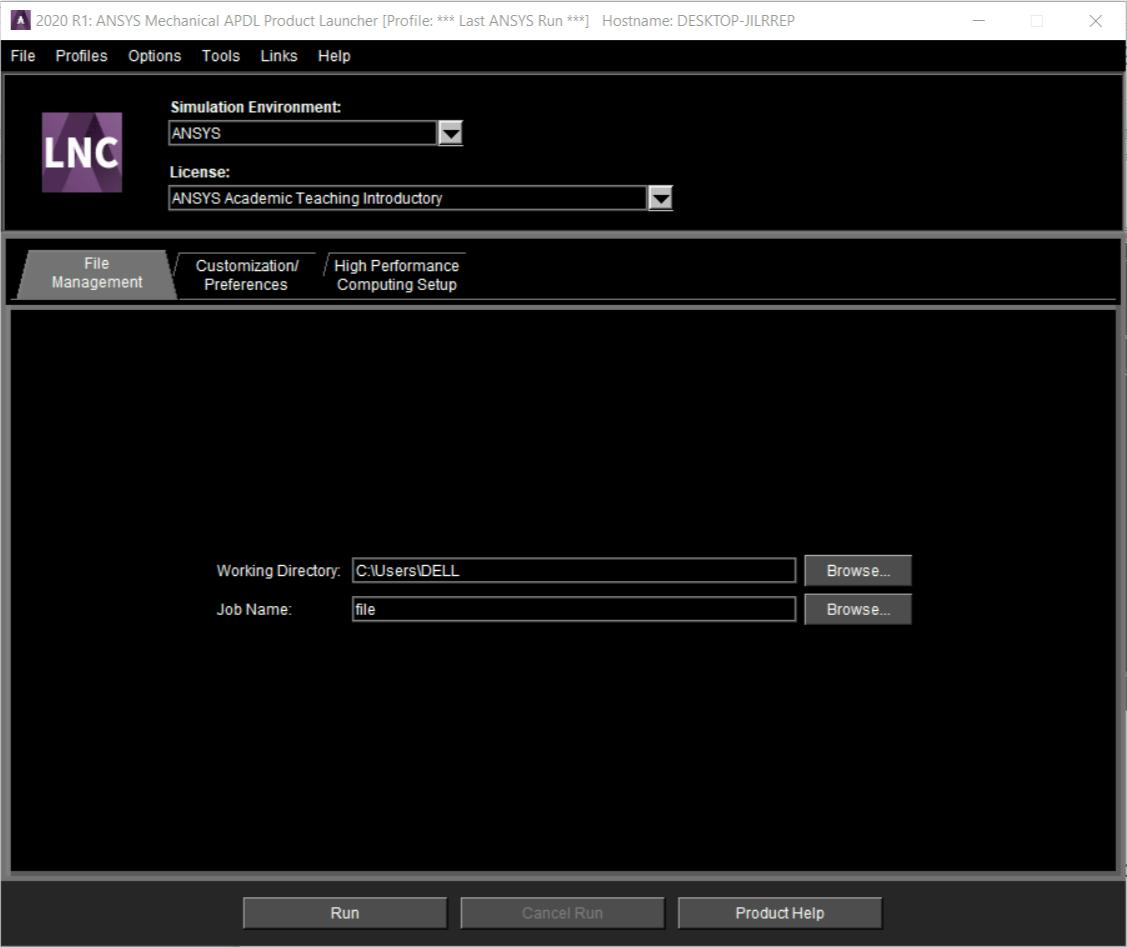
Use the Mechanical APDL Product Launcher (Fig. 1.5) to run an ANSYS
program, one of the auxiliary programs, or to access a modifiable ANSYS file.
In order to access ANSYS functionality, including the launcher, choose Start >
All Programs > ACP 2020 R1 and select the appropriate option. This causes
the launcher to appear automatically.
Fig. 1.5 Mechanical APDL Product Launcher
Start Menu Options on Windows
Choose Start > All Programs > ANSYS 2020 R1 New > Mechanical
APDL Product Launcher 2020 R1 to activate the launcher on Windows.
The File Management Tab
This tab contains the information necessary to manage the files, such
as location of the working directory and job name. The available options will
differ depending on the simulation environment selected. In
the ANSYS simulation environment, the analyst can specify:
Working directory
Sets the directory in which the ANSYS run will be executed. The
program writes files it generates to this directory. Type the new directory
name in the Working Directory text box to change the working directory or
press the Browse button to display a file selection dialog box. The working
directory can be specified by defining the
ANSYS201_WORKING_DIRECTORY environment variable. If
ANSYS201_WORKING_DIRECTORY is set, the launcher will use that setting
as the default. However, any working directory that is specified via the
launcher (such as a profile) overrides the
ANSYS201_WORKING_DIRECTORY environment variable setting.
Jobname
Defines the base filename used for all files generated by the ANSYS
run. The initial jobname defaults to file. It can be changed to any
alphanumeric string up to 32 characters long.
The Customization/Preferences Tab
The settings under this tab permit to specify detailed settings about
the working environment, such as memory settings, parallel/distributed
processing settings, custom executables, and additional parameters. The
available options will differ depending on the simulation environment
selected on the first tab.
On selecting the ANSYS or ANSYS Batch simulation environment, the
analyst can specify:
Custom Memory Settings
Specifies the use of custom memory settings rather than using the
default memory model. Select custom memory settings in order to set the -
m or -db options.
Total Workspace (MB)
Specifies the initial allocation of memory requested for the ANSYS run.
It defaults to 2 GB (2048 MB). This value is adequate for most modest-sized
models.
Database (MB)
Specifies the portion of total memory that the database will use for the
initial allocation. It defaults to 1GB (1024 MB). This value is adequate for
most modest-sized models.
Graphics Device Name
Sets the graphics device (Fig. 1.6). The GUI requires a terminal that
supports graphics. The graphics device can be WIN32 (default), WIN32c, or
3D. The 3D graphics driver facilitates to rotate a shaded view of the model.
Most newer graphics cards can handle this well.
Fig. 1.6
Read start.ans at start-up
Indicates whether the start201.ans file is read at start-up. Include
commands to be executed when the program starts up in
the start201.ans file. Uncheck the box to not read the start201.ans at
start-up.
1.4.1.2 Launcher Menu Options
Launcher-specific controls can be found under different launcher menu
options. The menu options are:
File: Use the File menu to exit.
Profiles: Use the Profiles menu to save a specific launcher configuration. The
profile the analyst is currently running is displayed in the launcher title bar. An
asterisk (*) follows the profile name if any settings are changed from what is
saved.
- Click Save Profile to save the current launcher configurations. A
name can be entered for this profile. The last run profile will
automatically be set as the default unless the analyst specifies
otherwise. Check the Set as Default box to set a subsequent profile
as the default .
- Click Load Profile to select the last run profile or one of the saved
profiles.
- Click Manage Profiles to rename a profile, specify a different
default profile, unset a default profile, or delete a profile.
If the analyst chooses to use the detailed working directory
browse dialog box, it shows what files are contained in each directory,
allows creating a new directory, and allows filtering on file type. The
standard browse dialog displays only the directories from which to
choose.
By default, the launcher saves existing output files from batch
runs. When a new file is created, the old one is renamed
to jobname.out. when the batch job is started. The
timestamp is in the format YYYY-MM-DD@hh_mm_ss and reflects the
date that the file was renamed, not the date the original file was
created. Uncheck the Save Existing Output Files From Batch
Runs item under the Options menu on the launcher to overwrite the
output file rather than renaming it.
Use the Reset ANSYS GUI Configuration option to return the
ANSYS GUI to its default configuration if the menus or toolbars have
been rearranged. This option is especially useful if an ANSYS GUI
component has been moved out of the screen's viewable area.
The Delete All Settings/Profiles option deletes all profiles
saved for this release and sets all Options menu settings back to the
defaults. The launcher will also close automatically.
1.4.2 Interactive Mode
In interactive mode, the analyst works with menus and dialog boxes to
drive the ANSYS program. ANSYS graphics capabilities, online help, and other
tools, such as wizards can be accessed easily.
The standard ANSYS GUI is the default. The Utility Menu, Standard
Toolbar, Input Window, ANSYS Toolbar, Main Menu, Graphics Window, Status
Area, and Output Window are shown in this layout. The toolbars can be
resized. The overall size of the GUI, the font, and the color can be modified.
Double-click on the following types of files from the Windows Explorer
to execute the ANSYS or DISPLAY programs:
- Double-click on a .db or .dbb file to execute the ANSYS program. When
executed in this way, ANSYS will set the filename to the filename of
the .db file and the working directory to the directory where the .db file
resides.
- Double-click on a .grph or .f33 file to execute the DISPLAY program.
The first plot that appears in the file will be loaded into DISPLAY
automatically.
Start Menu Options on Windows
Choose Start > All Programs > ANSYS 2020 R1 New > Mechanical
APDL Product Launcher 2020 R1 to activate the launcher on Windows.
The File Management Tab
This tab contains the information necessary to manage the files, such
as location of the working directory and job name. The available options will
differ depending on the simulation environment selected. In
the ANSYS simulation environment, the analyst can specify:
Working directory
Sets the directory in which the ANSYS run will be executed. The
program writes files it generates to this directory. Type the new directory
name in the Working Directory text box to change the working directory or
press the Browse button to display a file selection dialog box. The working
directory can be specified by defining the
ANSYS201_WORKING_DIRECTORY environment variable. If
ANSYS201_WORKING_DIRECTORY is set, the launcher will use that setting
as the default. However, any working directory that is specified via the
launcher (such as a profile) overrides the
ANSYS201_WORKING_DIRECTORY environment variable setting.
Jobname
Defines the base filename used for all files generated by the ANSYS
run. The initial jobname defaults to file. It can be changed to any
alphanumeric string up to 32 characters long.
The Customization/Preferences Tab
The settings under this tab permit to specify detailed settings about
the working environment, such as memory settings, parallel/distributed
processing settings, custom executables, and additional parameters. The
available options will differ depending on the simulation environment
selected on the first tab.
On selecting the ANSYS or ANSYS Batch simulation environment, the
analyst can specify:
Custom Memory Settings
Specifies the use of custom memory settings rather than using the
default memory model. Select custom memory settings in order to set the -
m or -db options.
Total Workspace (MB)
Specifies the initial allocation of memory requested for the ANSYS run.
It defaults to 2 GB (2048 MB). This value is adequate for most modest-sized
models.
Database (MB)
Specifies the portion of total memory that the database will use for the
initial allocation. It defaults to 1GB (1024 MB). This value is adequate for
most modest-sized models.
Graphics Device Name
Sets the graphics device (Fig. 1.6). The GUI requires a terminal that
supports graphics. The graphics device can be WIN32 (default), WIN32c, or
3D. The 3D graphics driver facilitates to rotate a shaded view of the model.
Most newer graphics cards can handle this well.
Read start.ans at start-up
Indicates whether the start201.ans file is read at start-up. Include
commands to be executed when the program starts up in
the start201.ans file. Uncheck the box to not read the start201.ans at
start-up.
1.4.1.2 Launcher Menu Options
Launcher-specific controls can be found under different launcher menu
options. The menu options are:
File: Use the File menu to exit.
Profiles: Use the Profiles menu to save a specific launcher configuration. The
profile the analyst is currently running is displayed in the launcher title bar. An
asterisk (*) follows the profile name if any settings are changed from what is
saved.
- Click Save Profile to save the current launcher configurations. A
name can be entered for this profile. The last run profile will
automatically be set as the default unless the analyst specifies
otherwise. Check the Set as Default box to set a subsequent profile
as the default .
- Click Load Profile to select the last run profile or one of the saved
profiles.
- Click Manage Profiles to rename a profile, specify a different
default profile, unset a default profile, or delete a profile.
If the analyst chooses to use the detailed working directory
browse dialog box, it shows what files are contained in each directory,
allows creating a new directory, and allows filtering on file type. The
standard browse dialog displays only the directories from which to
choose.
By default, the launcher saves existing output files from batch
runs. When a new file is created, the old one is renamed
to jobname.out. when the batch job is started. The
timestamp is in the format YYYY-MM-DD@hh_mm_ss and reflects the
date that the file was renamed, not the date the original file was
created. Uncheck the Save Existing Output Files From Batch
Runs item under the Options menu on the launcher to overwrite the
output file rather than renaming it.
Use the Reset ANSYS GUI Configuration option to return the
ANSYS GUI to its default configuration if the menus or toolbars have
been rearranged. This option is especially useful if an ANSYS GUI
component has been moved out of the screen's viewable area.
The Delete All Settings/Profiles option deletes all profiles
saved for this release and sets all Options menu settings back to the
defaults. The launcher will also close automatically.
1.4.2 Interactive Mode
In interactive mode, the analyst works with menus and dialog boxes to
drive the ANSYS program. ANSYS graphics capabilities, online help, and other
tools, such as wizards can be accessed easily.
The standard ANSYS GUI is the default. The Utility Menu, Standard
Toolbar, Input Window, ANSYS Toolbar, Main Menu, Graphics Window, Status
Area, and Output Window are shown in this layout. The toolbars can be
resized. The overall size of the GUI, the font, and the color can be modified.
Double-click on the following types of files from the Windows Explorer
to execute the ANSYS or DISPLAY programs:
- Double-click on a .db or .dbb file to execute the ANSYS program. When
executed in this way, ANSYS will set the filename to the filename of
the .db file and the working directory to the directory where the .db file
resides.
- Double-click on a .grph or .f33 file to execute the DISPLAY program.
The first plot that appears in the file will be loaded into DISPLAY
automatically.